Introduction
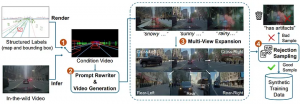
Overview of Cosmos-Drive-Dreams pipeline [1]
Cosmos-Drive-Dreams is a scalable synthetic data generation (SDG) pipeline designed to create high-fidelity, challenging driving scenarios for autonomous vehicle development, addressing the high cost and limited coverage of real-world data — especially rare edge cases. Powered by Cosmos-Drive, a suite of driving-specialized world models adapted from NVIDIA Cosmos-1, the pipeline enables controllable, spatiotemporally consistent, and multi-view video generation, improving downstream tasks such as 3D perception and driving policy learning.
In this tutorial, we first describe the environment setup process using FPT GPU Cloud, which provides a convenient installation experience and high-performance GPU resources for efficient large-scale video generation with Cosmos.
Prerequisite
We follow the installation instructions provided in [2]
1. Download the Cosmos Drive Dreams source code
git clone https://github.com/nv-tlabs/Cosmos-Drive-Dreams.git
cd Cosmos-Drive-Dreams
git submodule update --init –recursive
Note: The last command is used to update the Cosmos Transfer submodule. If it is not updated, the following command can be used to update it directly.
# Remove the submodule folder
rm -r cosmos-transfer1
# Add it manually
git submodule add --force https://github.com/nvidia-cosmos/cosmos-transfer1.git cosmos-transfer1
# Current version of Cosmos Drive Dreams works with commit b25a3ac
git checkout b25a3ac
cd ..
2. Setup conda environment
# Create the cosmos-transfer1 conda environment.
conda env create --file environment.yaml
# Activate the cosmos-transfer1 conda environment.
conda activate cosmos-drive-dreams
# Install the dependencies.
pip install -r requirements.txt
# Install vllm
pip install https://download.pytorch.org/whl/cu128/flashinfer/flashinfer_python-0.2.5%2Bcu128torch2.7-cp38-abi3-linux_x86_64.whl
export VLLM_ATTENTION_BACKEND=FLASHINFER
pip install vllm==0.9.0
<p style="text-align: justify;"># Patch Transformer engine linking issues in conda environments.
ln -sf $CONDA_PREFIX/lib/python3.12/site-packages/nvidia/*/include/* $CONDA_PREFIX/include/
ln -sf $CONDA_PREFIX/lib/python3.12/site-packages/nvidia/*/include/* $CONDA_PREFIX/include/python3.12
# Install Transformer engine.
pip install transformer-engine[pytorch]==2.4.0
3. Models downloading
Follow these steps to download models from Hugging Face
Generate a Hugging Face access token. Set the access token to ‘Read’ permission (default is ‘Fine-grained’).
Log in to Hugging Face with the access token:
huggingface-cli loginAccept the terms of Llama-Guard-3–8B terms, Cosmos-Tokenize1-CV8x8x8–720p, Cosmos-Guardrail1
Download the Cosmos model weights from Hugging Face:
cd cosmos-transfer1
PYTHONPATH=$(pwd) python scripts/download_checkpoints.py --output_dir checkpoints/ --model 7b_av
cd ..
Note that this will require about 300GB of free storage.
Here is a brief introduction to the models
Cosmos-Guardrail1 (model size 6.7 GB): a content safety model designed to enforce safety constraints.
Cosmos-Transfer1–7B-Sample-AV (model size 66 GB): Given a text description and HD map / LiDAR video as input, this model generates 121 video frames at a resolution of 704×1280.
Cosmos-Transfer1–7B-Sample-AV-Single2MultiView (model size 68 GB): Fine-tuned from the Cosmos world foundation model. It generates 57 video frames at a resolution of 576×1024, taking text and/or video as input to produce world-view video outputs.
Cosmos-Tokenize1-CV8x8x8–720p (model size 1.8 GB): Tokenizer model where C stands for continuous and V for video, with 8× temporal compression, 8×8 spatial compression, supporting 720p and above, and a 121-frame context window.
4. Create the HD map data
Before using the Cosmos Drive Dreams model, we need to prepare the data in a format that the model can use (e.g., video data).
Run the following command to convert RDS-HQ data into HD map video format:
python render_from_rds_hq.py -i ../assets/example -o ../outputs -d rds_hq --skip lidar --skip world_scenarioOutput will be saved to the `outputs/hdmap` directory
└── ftheta_camera_front_wide_120fov
<p style="text-align: justify;">├── 2d23a1f4-c269-46aa-8e7d-1bb595d1e421_2445376400000_2445396400000_0.mp4
<p style="text-align: justify;">└── 2d23a1f4-c269-46aa-8e7d-1bb595d1e421_2445376400000_2445396400000_1.mp4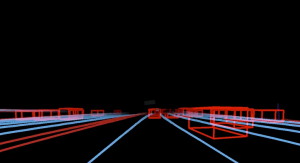
An example of HDMap, HDMap is a high-precision digital map that describes road layout details-such as lanes, signs, and signals-so autonomous vehicles can understand and navigate roads accurately.
If you want to generate multiple views, run the following command
python render_from_rds_hq.py -i ../assets/example -o ../outputs -d rds_hq_mv --skip lidar --skip world_scenarioThe script should complete in under a minute and produce a new directory at `outputs/hdmap`.
outputs/
└── hdmap/
├── ftheta_camera_cross_left_120fov
│   └── 2d23a1f4-c269-46aa-8e7d-1bb595d1e421_2445376400000_2445396400000_0.mp4
├── ftheta_camera_cross_right_120fov
│   └── 2d23a1f4-c269-46aa-8e7d-1bb595d1e421_2445376400000_2445396400000_0.mp4
├── ftheta_camera_front_wide_120fov
│   └── 2d23a1f4-c269-46aa-8e7d-1bb595d1e421_2445376400000_2445396400000_0.mp4
├── ftheta_camera_rear_left_120fov
└── 2d23a1f4-c269-46aa-8e7d-1bb595d1e421_2445376400000_2445396400000_0.mp4
...
5. Rewrite captions
To change the environment of the generated video, the input caption can be rewritten using a large language model (for example, Qwen3–14B).
The following command is used to rewrite the caption of the input video:
python scripts/rewrite_caption.py -i assets/example/captions -o outputs/captionsMore details, the current caption of video is:
The video shows a highway scene during twilight or early evening, with a clear sky transitioning from blue to darker shades. Several cars are visible on the road, some moving forward while others appear stationary, indicating moderate traffic. The road is flanked by trees and a concrete barrier on one side, with utility poles and wires running parallel to the highway. A billboard is visible in the distance, and the overall atmosphere suggests a calm urban or suburban setting. The lighting indicates that it is either dusk or dawn, with the sky showing signs of fading light.System prompt setting
You are a prompt optimization specialist. Your task is to rewrite user-provided input prompts into high-quality English descriptions by modifying specific temporal or environmental details, while preserving the core content and actions of the original scene. \n
There are two types of rewrites: \n
1. Time of Day: Change the time setting in the caption, including Golden hour (with long shadows), Morning, and Night. \n
2. Environment/Weather: Change the weather condition in the caption, including Rainy, Snowy, Sunny, Foggy. \n
<p style="text-align: justify;">Requirements:
- Keep the scene and actions the same (e.g., a car driving down a highway should still be a car driving down a highway).
- Change only the details related to time or environment as instructed.
- Ensure the rewrite matches the new condition (e.g., no mention of sun glare in a foggy or snowy version).
User prompt for `Morning` (other conditions include Golden hour, Night, Rainy, Snowy, Sunny, Foggy, etc.):
Rewrite the following caption to include specific environmental or temporal details. \n
Original Caption: The video shows a highway scene during twilight or early evening, with a clear sky transitioning from blue to darker shades. Several cars are visible on the road, some moving forward while others appear stationary, indicating moderate traffic. The road is flanked by trees and a concrete barrier on one side, with utility poles and wires running parallel to the highway. A billboard is visible in the distance, and the overall atmosphere suggests a calm urban or suburban setting. The lighting indicates that it is either dusk or dawn, with the sky showing signs of fading light. \n
Rewrite Type: Morning \n
Please provide a detailed and high-quality rewrite that maintains the core content of the scene. Format your response by having the rewritten caption following 'New caption:' /no_think\n
The rewritten caption is saved to the `outputs/captions` directory
6. Generate single view video
Now, combine the HD map video with the rewritten prompt to generate the front-view video using the following command:
PYTHONPATH="cosmos-transfer1" python scripts/generate_video_single_view.py --caption_path outputs/captions --input_path outputs --video_save_folder outputs/single_view --checkpoint_dir checkpoints/ --is_av_sample --controlnet_specs assets/sample_av_hdmap_spec.json
Note: This command generates several single-view videos and runs relatively slowly — about 5 minutes per video (121 frames) on a single H200 GPU. The process can be sped up by generating multiple videos in parallel.
#!/usr/bin/env bash
# Use multiple gpus
export CUDA_VISIBLE_DEVICES="${CUDA_VISIBLE_DEVICES:=0,1,2,3}"
export NUM_GPU="${NUM_GPU:=4}"
<p style="text-align: justify;"># Make sure PYTHONPATH is set correctly
export PYTHONPATH="cosmos-transfer1:${PYTHONPATH:-}"
<p style="text-align: justify;">torchrun --nproc_per_node=$NUM_GPU --nnodes=1 --node_rank=0 scripts/generate_video_single_view.py \
--caption_path outputs/captions \
--input_path outputs \
--video_save_folder outputs/single_view \
--checkpoint_dir checkpoints/ \
--is_av_sample \
--controlnet_specs assets/sample_av_hdmap_spec.json \
--num_gpus $NUM_GPU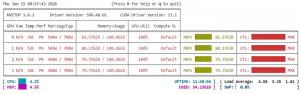
GPU usage for single-view video generation
The output video is saved to the `outputs/single_view` directory
outputs/single_view/
├── 2d23a1f4-c269-46aa-8e7d-1bb595d1e421_2445376400000_2445396400000_Golden hour.mp4
├── 2d23a1f4-c269-46aa-8e7d-1bb595d1e421_2445376400000_2445396400000_Golden hour.txt
├── 2d23a1f4-c269-46aa-8e7d-1bb595d1e421_2445376400000_2445396400000_Original.mp4
└── 2d23a1f4-c269-46aa-8e7d-1bb595d1e421_2445376400000_2445396400000_Original.txt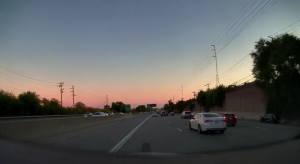
The output of the single-view (front-view) generation under the rewritten prompt
7. Generate multiple view videos
To generate multi-view videos, you must first generate the HD map for all views. Run the following command:
PYTHONPATH="cosmos-transfer1" python scripts/generate_video_multi_view.py --caption_path outputs/captions --input_path outputs --input_view_path outputs/single_view --video_save_folder outputs/multi_view --checkpoint_dir checkpoints --is_av_sample --controlnet_specs assets/sample_av_hdmap_multiview_spec.json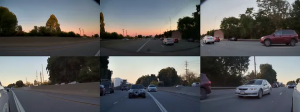
Outputs of multiple views: front, front-left, front-right, rear, rear-left, and rear-right
Likewise, here is the script to run on multiple GPUs.
#!/usr/bin/env bash
# Expose 4 GPUs
export CUDA_VISIBLE_DEVICES="${CUDA_VISIBLE_DEVICES:-0,1,2,3}"
<p style="text-align: justify;"># Number of GPUs
export NUM_GPU="${NUM_GPU:-4}"
<p style="text-align: justify;"># Python path
export PYTHONPATH="cosmos-transfer1:${PYTHONPATH:-}"
<p style="text-align: justify;"># Multi-GPU distributed run
torchrun \
--nproc_per_node=$NUM_GPU \
--nnodes=1 \
--node_rank=0 \
scripts/generate_video_multi_view.py \
--caption_path outputs/captions \
--input_path outputs \
--input_view_path outputs/single_view \
--video_save_folder outputs/multi_view \
--checkpoint_dir checkpoints \
--is_av_sample \
--controlnet_specs assets/sample_av_hdmap_multiview_spec.json \
--num_gpus $NUM_GPU
Multi-GPU Scaling Performance
We evaluate computational efficiency by comparing the execution times of 1, 4, and 8 GPU configurations across single-view and multiple-view scenarios. Through this analysis, we illustrate the scaling performance of the hardware, highlighting how additional GPU resources mitigate the processing overhead inherent in complex, multiple-view workloads.
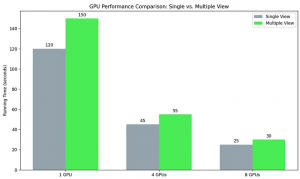
Analysis of computational speedup, demonstrating the impact of multi-GPU scaling on processing efficiency for single- and multi-view generation. Performance is measured using FPT Cloud H200 GPUs [3]
References
[1] Cosmos-Drive-Dreams: Scalable Synthetic Driving Data Generation with World Foundation Models https://arxiv.org/abs/2506.09042
[2] Cosmos Drive Dream install: https://github.com/nv-tlabs/Cosmos-Drive-Dreams/blob/main/INSTALL.md
[3] FPT AI Factory: https://factory.fpt.ai/ja/